How to Ganache a Cake
This is the first in our 3 part series of the next 3 Tuesdays teaching you how to make a fondant cake right from the basics.
Part 1 this week will show you how to properly set up and ganache a cake.
https://youtu.be/tBu-l4JtbIA?list=PLCte0FD_mGphmLCJJh41ZRysLuZacmESl
Materials – some items are for the next steps which we will show you in parts 2 and 3
1 x 7” round cake
100 ml Syrup
1.2 kg ganache
1.5 kg white fondant
250g each of orange, pink and yellow coloured fondant/sugarpaste
150g of red fondant icing fondant/sugarpaste
Sugar glue
Green Floristry wire
Edible glitter
Flower and Leaf Glaze (optional)
Equipment
4” crooked palette knife
Serrated bread knife
Masonite base board 9” or larger
Masonite cake board 7”
Pastry brush
Scraper
Smoothers
Rolling Pin
Ribbon cutter or small sharp knife
Small rectangle piece of thick smooth plastic (flexi scraper)
1. Attach your smaller cake board to the larger cake board with hot glue or chocolate ganache and put aside to allow to set while you cut your cake.
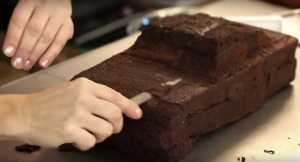
2. Using the blunt side of your bread knife, create 2 “cutting” indentations around your cake, ensuring the lines are even and approximately 1” apart. If your cake is uneven or particularly domed on top, even the top out at this point also.
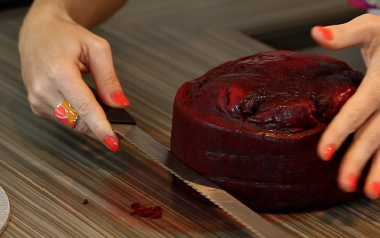
3. Now with the sharp side of your knife, gently push the knife through the cake, following the indented lines being careful not to saw too much as this will create excess crumbs.

4. Brush your 3 tiers with sugar syrup.
5. Using your palette knife spread some ganache on your board and place the bottom third of your cake evenly on it.

6. Spread ganache evenly to each layer of the cake approximately 1cm thick, filling in the edges of the middle tier if necessary with off cuts of the excess cake trimmed from the top of the cake dome.
7. Apply ganache around the side of the cake to catch any crumbs. Allow cake to set until chocolate is touch dry.
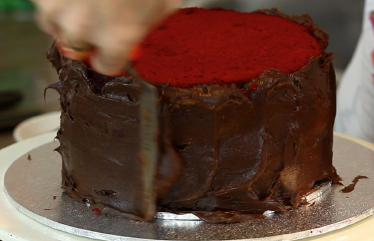
8. Fill the side of the cake with ganache out to the edge of the 7” board and also creating a lip slightly above the top of the cake.

9. Scrape of the excess ganache with your scraper ensuring that you hold your scraper at exactly a 90 degree angle.
10. Apply ganache to the top using your palette knife, levelling as you go using your scraper as well if necessary. Allow your cake to set until the ganache is firm.

11. Taking a bowl of boiling water, dip your tools in the hot water and continue the scraping and smoothing with hot tools until you have a perfectly smooth surface.

12. Once you have a perfectly smooth surface, allow your cake to sit (preferably overnight) to allow the chocolate to set before covering.
Enjoy and I look forward to your comments and will see you in Part 2!
Happy Caking xx